

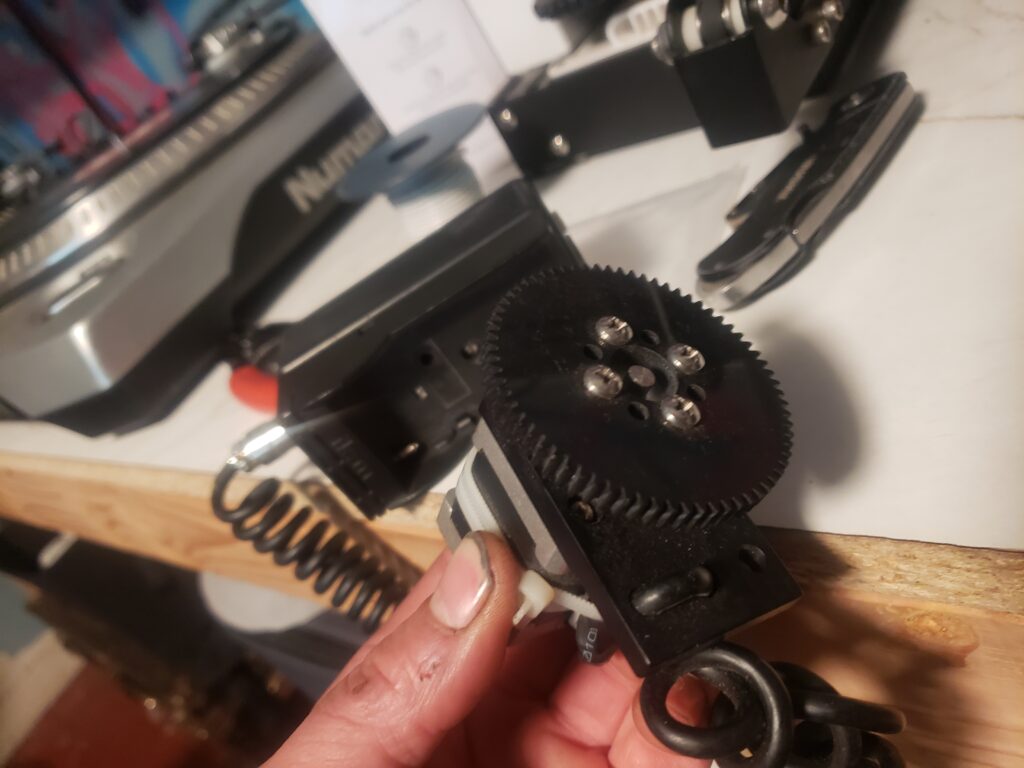
I am using a pair of anarduinos to handle control logic and transmit data from the remote to the receiver. The receiver uses the “easydriver” stepper motor driver to drive a low current stepper motor. I am still testing different motor sizes and toque/current ratings, but I think I will probably settle on a nema 14 sized stepper that can provide 32 oz./inch of torque, and consumes 500mah @ 7.5 volts. This motor gives me enough toque to turn my nikon ais primes at a decent speed. A motor that can suppply it’s rated torque at 7.5v will allow me to power the receiver with any small camera battery (most are rated at 7.2-7.4 V) I have mounted a SONY NPF style battery plate on the reciever, for the most compact setup. If I am running other accessories from an Anton Bauer or Sony V-mount battery, I can also supply power to the receiver via an external power input. I use 2.1mm (size M) barrel DC jacks for 5v connections and 2.5mm (size N) for everything else. This ensures that I don’t accidentally feed 12v into a 5v device (I fried a monitor this way once…)
So These are the major hardware components of the system. I will add pictures of the guts, and some videos soon, but for now I will give you some more information about the features that are currently implemented in the code which can be found here: FOCOLOCO
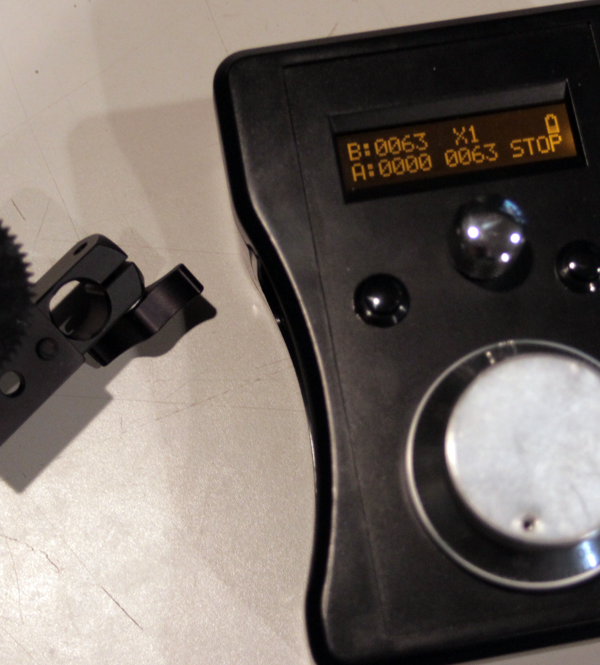
Transceiver Performance and Control Scheme:
The remote has an impressive range, I have tested it up to 1,000 ft. away (line of sight) and it worked remarkably well. I think the way the control scheme works is very helpful if you do run into interference. To keep the latency as low as possible, I am not using ack’s. All the hard work is done in the handheld unit. The transmitter sketch goes through a calibration routine upon startup, this establishes the hard stops on the lens (macro and infinity), after this the user can program “soft stops” (A,B) and the position value is constrained between these limits. At the end we end up sending the constrained position integer to the receiver as fast as possible, but only when the position has changed from it’s previous value. This way, redundant info is not send through the air, and the receiver is available to accept a new position as soon as it’s available. If the signal is lost momentarily, a new position value is sent soon after, and the user probably does not even notice since it updates so quickly. The receiver sketch uses the accelstepper library. This is very useful because it allows the motor to accelerate and deccelerate in a natural way, when i rack back and forth between soft stops, it’s actually smoother than i could ever operate a manual follow focus….
Resolution:
The encoder library I am using supports 4x counting. This is a good thing because high-resolution optical encoders are expensive, and even if you can afford them, you have to find a knob and a way to secure it to your control panel and a bunch of other stuff. The only ones I found that were fully enclosed had too tall a profile, so i ended up using a CNC mill encoder wheel. Now this is only a 100 p/r encoder, but it is detented, and after removing the detents, the 4x counting of the encoder library gives it an effective resolution of 400p/r! It comes with a very sturdy housing and a nice heavy wheel that feels like a proper follow focus. The Easy driver is capable of 1/8th microstepping so the 200step stepper motor has a resolution of 800 positions per revolution, after it’s geared down by the ratio between the drive gear and the lens gear, it becomes something like 2000 positions/revolutionl. This is quite a high resolution for this application, I actually use a multiplier of 2x or 4x to get it back down to a good balance between speed and precision.
Haptic Feedback:
Since I am using an endless rotary encoder on the handheld unit, I needed a way to simulate the feel of a hardstop. I added a small vibration motor inside the handheld enclosure. When the position reaches a softstop, the motor vibrates briefly, indicating that I have reached my focus mark. This is great when using in the dark, or when AC must have his eyes on the action and cannot look at the LCD screen.
Shutter Control:
I think it is useful for the AC to be able to start and stop recording if the camera operator has his hands busy holding a shoulder rig or steadicam. This feature is also incredibly useful when the camera is mounted on a jib crane, or motion control rig, really any scenario where wireless lens control is useful, so it wireless shutter control. This will cut down on the amount of pre and post roll on each take, which can save a lot of resources over the course of an entire production. It was quite easy to implement the circuit and code for this part of the application. When a button is pressed on the remote, the receiving unit pulls a digital pin low for a few ms, and then returns to high. Since the receiver and the camera use different power supplies, an optoisolator is used to protect the camera in case of an electrical fault or some other catastrophe. The output of the opto is connected to the camera’s shutter release port. Since we are using Canon DSLR’s, we use the “shutter half-press starts record” feature in Magic Lantern to start and stop video recording through the shutter port. The circuit can be easily modified for other DSLR’s with similar capability. I have plans to implement LANC control as well, this will open up lots of cool possibilities with professional cameras that allow many functions to be controlled by this protocol.
Wireless Sync:
Since wireless shutter control was implemented, I decided to build some more receivers for our other cameras, and one for our external audio recorder. If I press the record start/stop on the remote unit, every camera or audio device that has a receiver plugged in will start simultaneously. This is really nice for multicam shoots. The delay is variable, but it’s usually within a few frames, so all my clips are about the same length, and I just nudge them until the delay is gone. It’s really nice to be able to set everything up before a live production, and be able to start and stop all the static cameras and external audio without having to run all-over the venue. Sometimes I would start the audio recording for up to an hour before the band starts playing, because they never start on time and I don’t want to miss anything if I have to run around to start a few cameras and audio, and make it back to the camera I am operating. I did this for too long. I’m so tired of working inefficiently. It takes all the fun out of production.
Current State of Development:
I am planning some additional features, as well as units to control iris (with a fader/slide potentionmeter) and zoom (with a rocker joystick) The reason I designed a wireless ff was not because I though i could do better than any other system out there, but because I need one that can exist on a network with my other motion control devices, so that lens control can be synchronized with timelapse and other types of automated moving shots. I will post more details for “MOCOLOCO” soon. This is a multi-axis motion controller with realtime overdub and timelapse features.
Peace Gnarly Dudes!